






The Cannabis Flowering Phase: Week-by-Week Guide
The flowering phase is without a doubt the most rewarding part of the entire growing journey. After weeks of caring for your young plants during their vegetative growth, this is the moment where all your patience pays off. Those vibrant green plants stop focusing on growing bigger leaves and turn all their energy toward producing dense, aromatic, and resinous buds.
Whether you are growing indoors under controlled lighting or outdoors relying on natural sunlight, the bloom stage requires careful attention. Indoors, you control the seasons by switching your timer to a 12/12 light schedule. Outdoors, nature takes the wheel as late summer days grow shorter, triggering your plants to start blooming naturally.
Every grower remembers their first successful bloom. Watching tiny white pistils transform into heavy, resin-dripping colas is a special experience. To make sure your plants reach their full genetic potential, let us look at how the flowering phase unfolds week by week, covering both indoor setups and outdoor garden care.
If you are starting from the very beginning or planning your next cycle, make sure to review our guide on the cannabis growth phase to ensure your plants are healthy before flowering begins.
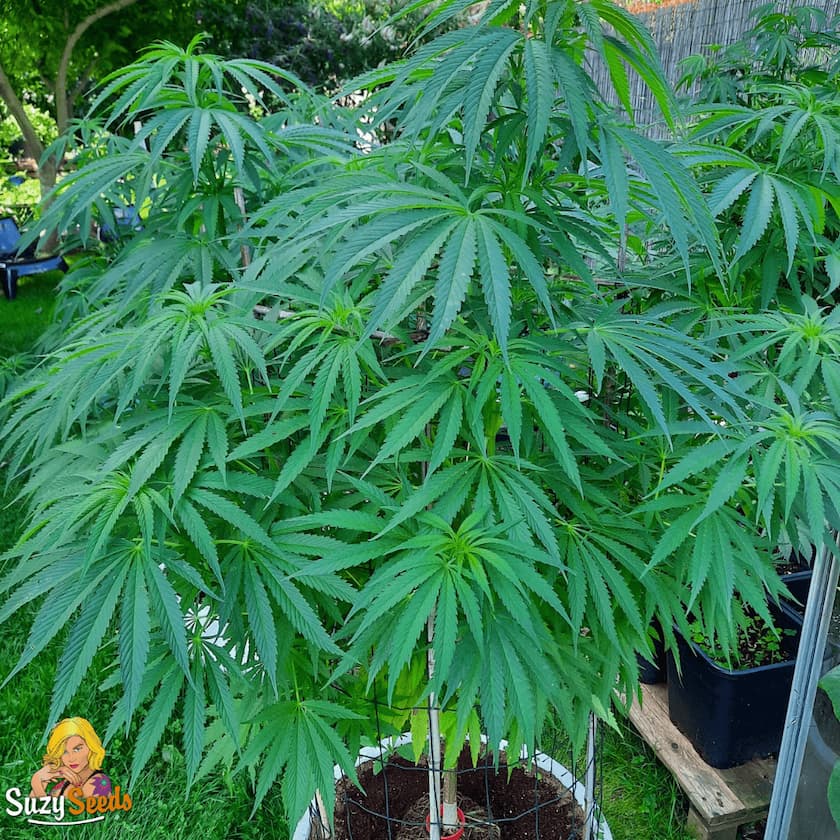 Suzy’s Tip: Watch your plant closely and try to tell what it needs. Every plant blooms in its own way, so in some strains, the buds will grow from the beginning, while in other strains they will only grow in size and weight in a later stage. The needs of the plant can also change after a couple of weeks.
Weeks 1 to 3: The Transition and The Stretch
What Happens Indoors: As soon as you switch your lights to 12 hours of light and 12 hours of darkness, your plants undergo a sudden growth spurt known as the stretch. Depending on whether you grow an indica or a sativa, your plant can double or even triple in height over these three weeks. Small white hairs, called pistils, will start emerging at the nodes where branches meet the main stem.
What Happens Outdoors: As summer progresses and nights become longer, your outdoor plants receive the natural signal to begin flowering. You will notice the growing tips becoming lighter green and forming tight clusters of leaves with early white pistils. The plant will also stretch significantly during this time.
Nutrient Care: During the first week of transition, your plants still require nitrogen to support their sudden vertical growth. By week two and three, begin transitioning toward bloom fertilizers that contain higher levels of phosphorus and potassium.
Canopy Management: This is the ideal window to apply low-stress training (LST) or gently tie down tall branches. Once stems harden later in bloom, bending them becomes risky. Gently training the main branches outwards allows light to reach the lower nodes, turning minor branch tips into substantial buds.
Weeks 3 to 5: Early Bud Formation and Calyx Expansion
What Happens Indoors: Vertical growth comes to a complete halt. Your plant stops spending energy on height and focuses entirely on developing flower structures. White pistils multiply rapidly, forming compact clusters at every bud site. Tiny crystal-like glands, known as trichomes, begin to appear on the young flower surfaces and surrounding sugar leaves.
What Happens Outdoors: Outdoor buds begin to take shape as distinct, round clusters. The sweet aroma of your plants will start to become noticeable in the garden, especially during warm afternoons.
Nutrient Care: This is the stage where phosphorus and potassium become essential. Phosphorus supports the structural development of the flowers, while potassium helps transport sugars throughout the plant. Introducing a dedicated PK booster during this period helps fuel early bud expansion.
Canopy Management: Indoors, clear away a few selective fan leaves that cast dark shadows over lower flower sites. Outdoors, only remove fan leaves that are damaged, yellowing, or directly blocking airflow through dense parts of the plant.
 Weeks 6 to 8: Bud Swelling and Resin Production
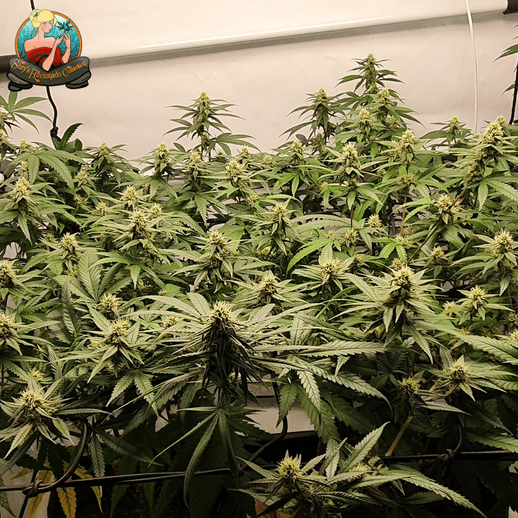
What Happens Indoors: Your flowers enter their main weight-building phase. Calyxes swell and press tightly against each other, turning individual flower clusters into thick, continuous colas. The white pistils will slowly begin to darken, changing to shades of orange, red, or brown. Aroma levels will reach their peak.
What Happens Outdoors: Outdoor colas become heavy and dense. Early autumn weather often brings cooler nights, which can trigger natural color shifts in your plants, displaying shades of purple, red, or deep blue.
Nutrient Care: Reduce nitrogen levels completely while maintaining steady levels of phosphorus and potassium. Always follow recommended fertilizer dosages carefully, as overfeeding at this stage can burn leaf tips and impair flower quality.
Canopy Management: Heavy outdoor colas may begin to bend under their own weight, especially after rain. Use bamboo canes, plant stakes, or soft garden ties to support heavy branches and prevent them from breaking. Indoors, keep your circulating fans active to prevent pockets of stagnant air from forming inside dense canopies.
2026 Flowering Highlights & Grower Wins
This August, watch your outdoor grow shine with our Northern Lights Auto a limited-edition strain packing extra potency! Grower K raves: “Pulled 450g/m² with OG Kush in 8 weeks-mind blown!” Whether it’s sticky trichomes or resin-rich colas, this phase is your moment to shine. Check strain guides for the perfect pick!
As your plant transitions, swap grow nutrients for bloom boosters-some sneak in grow ferts week 1-2 for height, others jump to PK 13/14 for chunky buds. Height growth halts after three weeks, so phosphorus and potassium fuel the finale. Foliar feeding? Mist leaves indoors before lights-on or outdoors early to dodge burn and mold—just once or twice weekly. Top or tie down for space, and ventilate with fans or CO2-rich air (800-1200 ppm) to turbocharge those outdoor blooms.
Grow and Bloom Fertilizer
As your plant transitions, it’s time to swap grow nutrients for bloom boosters. Some growers sneak in grow ferts for the first or second week—perfect if your plants need a height boost to fill out space. Want to keep them compact? Jump straight to bloom nutrients. It’s all about control, and a few centimeters can make a big difference!
Bloom Nutrients
After three weeks, height growth stops, and bud formation takes over. This is when phosphorus and potassium become your best friends, fueling those chunky buds. A PK 13/14 mix is a go-to for hardcore flowering power-just follow the bottle’s dosing to avoid overfeeding mishaps.
The nutrients are rapidly absorbed in this way and any nutritional deficiencies are corrected quickly. The chance of overfertilizing is minimal when administering foliar feeding.
When growing inside, the best moment to administer foliar feeding to your plants is half an hour before the lamps go on. The light of the lamps is very powerful from the beginning, so you run the risk of burning the leaves if they are still too wet.
Outdoor cannabis plants are best being administered foliar feeding early in the day, before the sun is too strong. It's no use giving them feeding when there is no light because then the plants don't grow and they don't need extra feeding.
Besides that, you increase the risk of mold if they are too wet. Foliar feeding has to be sprayed on top of the leaves, once or twice per week. When giving foliar feeding, you also have to watch your plant closely to discover which nutrients it needs.
Suzy’s Tip: Every plant’s a diva with its own style! Some strains pop buds early, others bulk up later. Keep an eye on yours and adjust-your green buddy will thank you!
Foliar Feeding
Nailed your fertilization game? You might not need foliar feeding, but it’s a lifesaver if your plant’s hinting at nutrient gaps. Spray it on the leaves, and those goodies get absorbed fast with minimal overfertilization risk. Indoors, mist half an hour before lights-on to dodge leaf burn. Outdoors, go early before the sun turns up the heat—wet leaves at night invite mold. Spray once or twice weekly, and watch for cues on what your plant craves.
Top/tie down
If space is limited, you might want to top or bind down your cannabis plants. Topping is removing the top of the plant. You will get two main tops instead of one. These do not grow as tall as one top but they yield more. You can bind a plant down by pulling the biggest bud down and binding it with slight tension. This will give you the same effect as topping, but you have the advantage that the largest bud is retained. The lower branches will develop better and the plant will grow bigger buds.
Ventilation
For a good flowering period, the plants need sufficient CO2 (carbon dioxide). They need this to grow powerfully during the hours that there is light. The more CO2 is present in the air, the faster the plants will be able to develop and the better they will be able to withstand high temperatures.
You can use fans, but in good growing spaces, holes are made in the ground at one side to let air in, while at the other side an extraction system is installed as high as possible. This ensures an optimal circulation of air, from which the plants benefit by using the CO2-rich air that is continually circulating. Fresh air is continually sucked in through the holes in the ground. A fan is also very important. These do not only ensure good air circulation but also give the plants a pleasant breeze which will cause them to grow even better.
 Bud formation
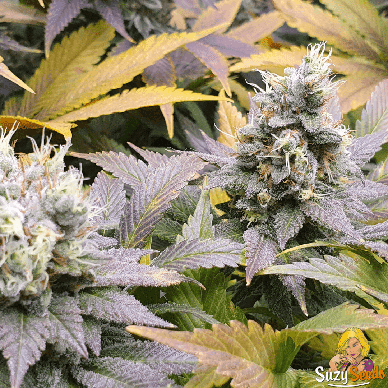
The bud formation phase is the heart-pounding climax of your cannabis journey, where those little green promises turn into fat, resin-drenched masterpieces! This magic typically kicks in around weeks 3 to 5 of the flowering stage, though it varies by strain. Indicas might hit their stride early with dense, compact buds, while sativas stretch it out, building airy, elongated colas. Autos can surprise you with a quick bloom in 7-9 weeks, while photoperiods often peak at 8-12 weeks. It’s the moment white pistils start multiplying, tiny calyxes swell, and buds fuse into glorious, sticky clusters—pure eye candy for any grower!
Stages of Bud Development
Bud formation unfolds in distinct phases. First, you’ll see a pre-flower stretch as pistils emerge, signaling the plant’s shift to reproduction. By week 3-4, calyxes plump up, and trichomes begin forming, hinting at that terpene-rich aroma. The real explosion hits weeks 5-7, where buds bulk up, doubling or tripling in size for some strains like heavy indica hybrids. Late flowering (weeks 7-12) brings resin peaktrichomes turn from clear to milky, then amber, guiding your harvest window. Keep a jeweler’s loupe handy; it’s like spying on nature’s treasure map!
Strain-Specific Tricks
Every strain’s a diva with its own timeline. Fast-flowering strains like Top-44 might pack on weight early, while hazes like Yellow Lemon Haze stretch and fill out later. Indicas tend to stack tight buds low on the plant, while sativas reach for the sky with looser colas. Know your genetics-check strain guides or ask our community for the scoop on your pick!
Environmental Magic
Light, temp, and humidity are your bud’s best pals. Stick to that 12/12 cycle indoors, but ensure even light distribution-uneven spots mean uneven buds. Keep temps 20-26°C and humidity 40-50% to avoid mold, especially as buds densify. A slight dip to 18-20°C in late flowering can boost terpene and anthocyanin production, giving those purple hues a pop. CO2 enrichment (up to 800-1200 ppm) during lights-on can turbocharge growth, but don’t overdo it-your plants aren’t rocket fuel!
Harvest Prep
As buds mature, trichomes turn from clear to milky, then amber-your cue to plan the harvest (often 7-9 weeks for autos, 8-12 for photos). Keep humidity below 50% in the last weeks to dodge mold, and consider flushing with plain water 1-2 weeks before cutting to boost flavor. Timing’s key-harvest too early, and it’s a light high; too late, and it’s a couch-lock fiesta!